Troubleshooting
Beam dump happens
When Beam dump unfortunately happened, there will be no beam and the valves will automatically close. Check the chat panel and Public website for machine status (should be 500 mA for small ring) for updates.
Once the beam is restored: Reopen the valves before resuming measurements.
Open valves in the beamline and PLC reset
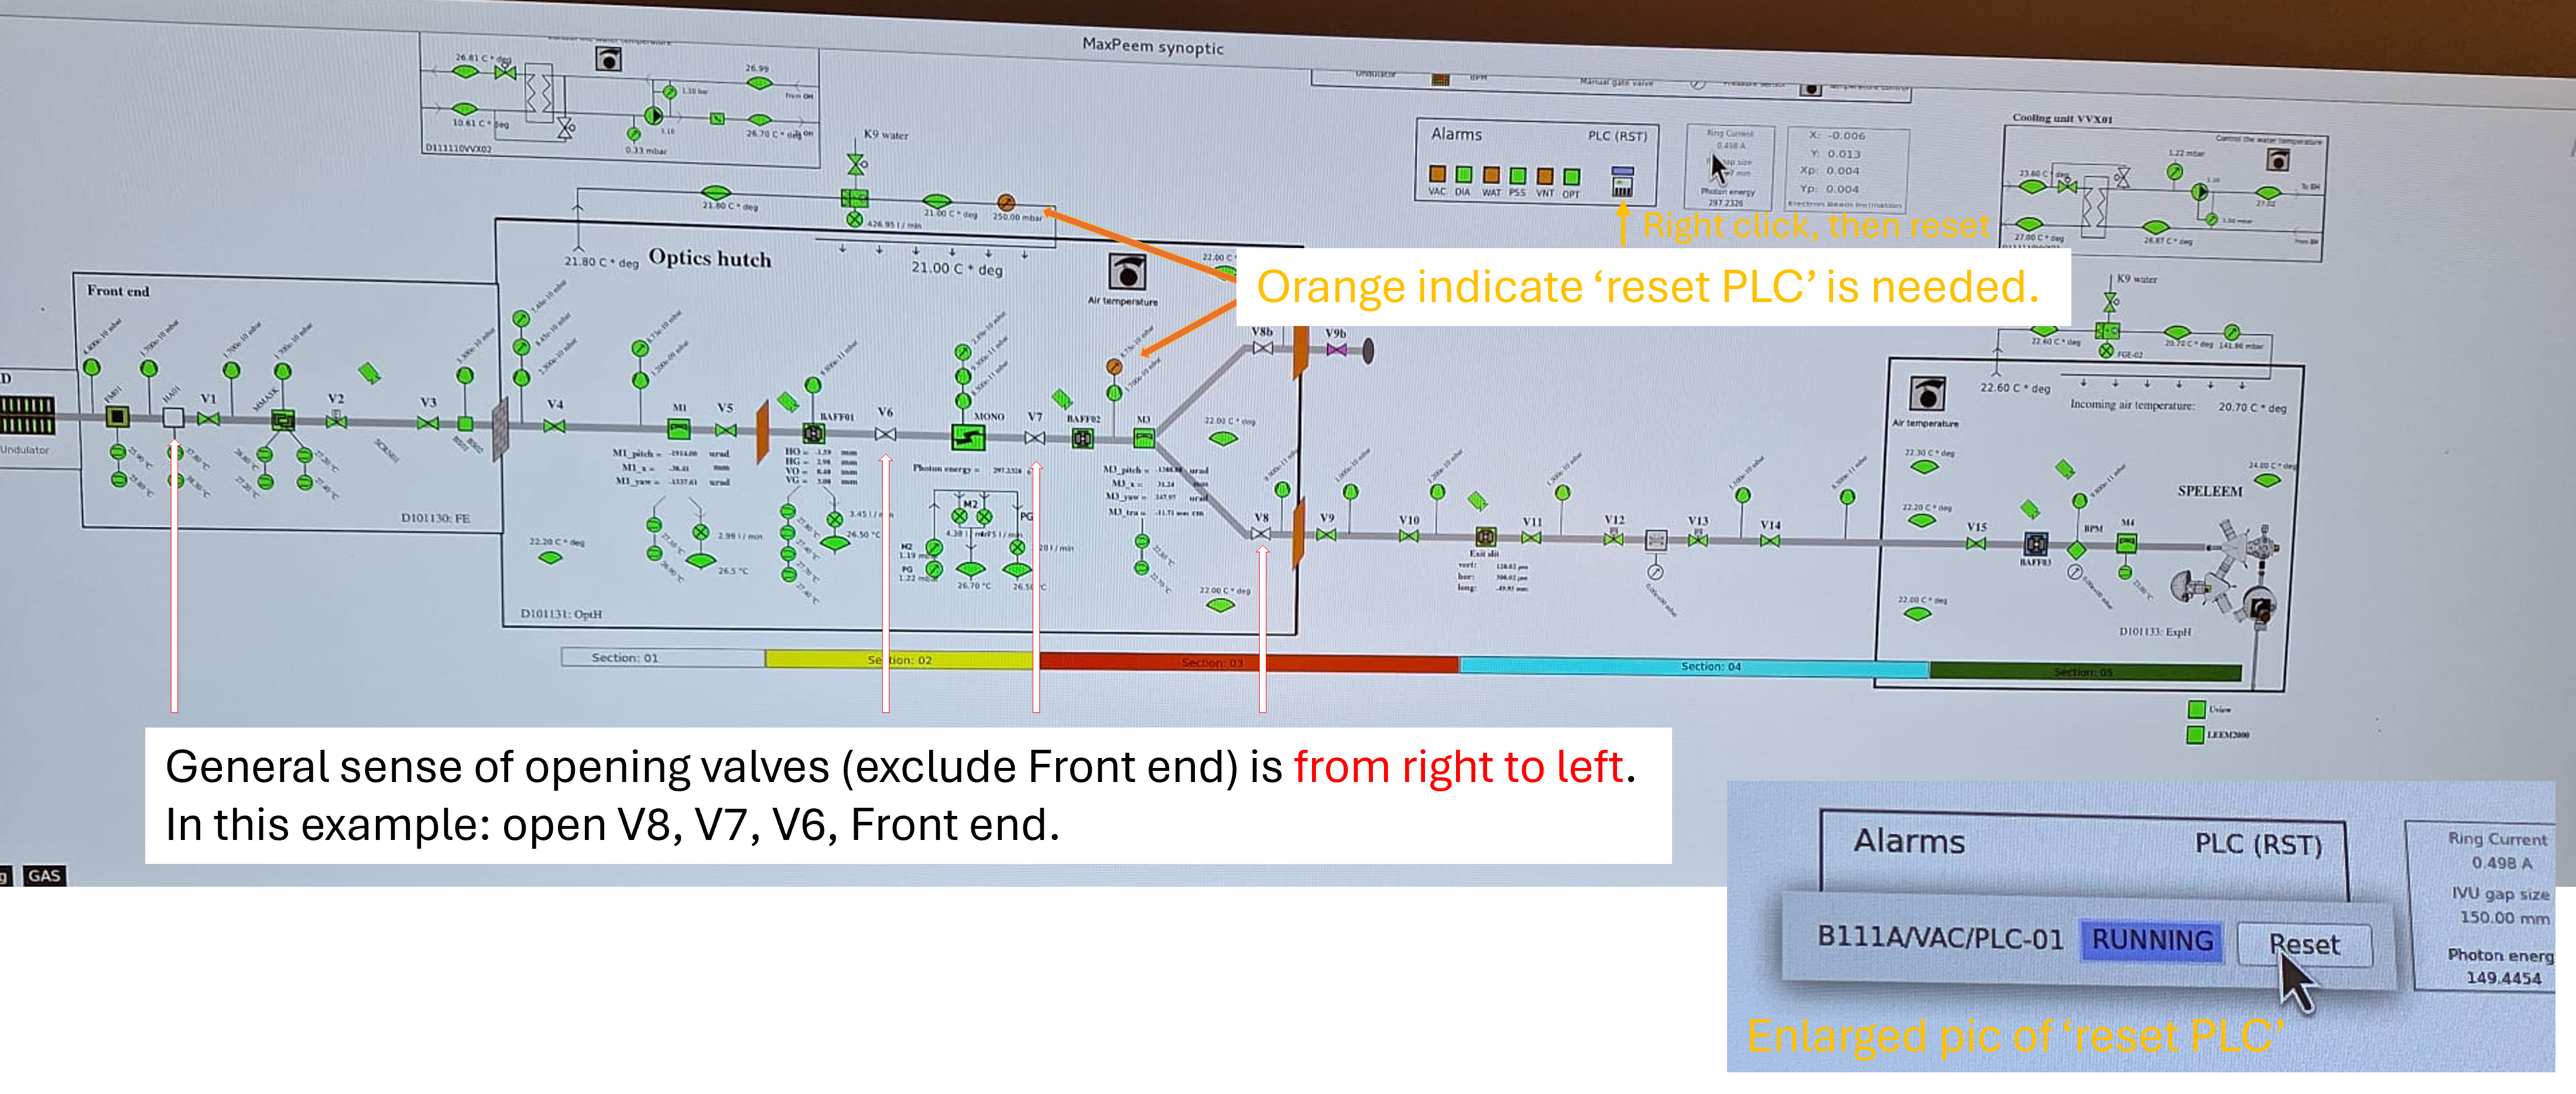
In general, valves in the beamline (exclude Front end) should be opened from right to left. The Front End valves are opened only after the downstream valves are confirmed open, and the order of opening can be found in the next section.
How to open a valve in beamline: 1. Right‑click on the valve symbol. 2. Select Open.
Example Scenario
In the example shown in the image below:
Valves V6, V7, and V8 (in Optical Hutch) are shown as closed.
Valve HA‑01 (Front End) is shown as closed.
Two pressure monitor symbols are displayed in orange.
Required Actions (Based on the Example)
Open (exclude Front end) valves from right to left.
In this case, the correct order is: V8 - V7 - V6
After all downstream valves are open, open the Front End valve (e.g., HA‑01).
If additional Front End valves are closed, refer to the next section. for the specific opening order for Front End valves.
HA-01 is always the last one to be opened.
Reset the PLC.
Right‑click on the PLC reset symbol indicated in the example image.
Select Reset.
Caution
Do not open Front End valves before downstream valves are fully open.
Open valves in the Front end
Remember to open valves in Optics hutch before opening the valves in Front end. Order to open valves in front end: V1, BS-01, HA-01 Order to close valves in front end: HA-01, BS-01, V1
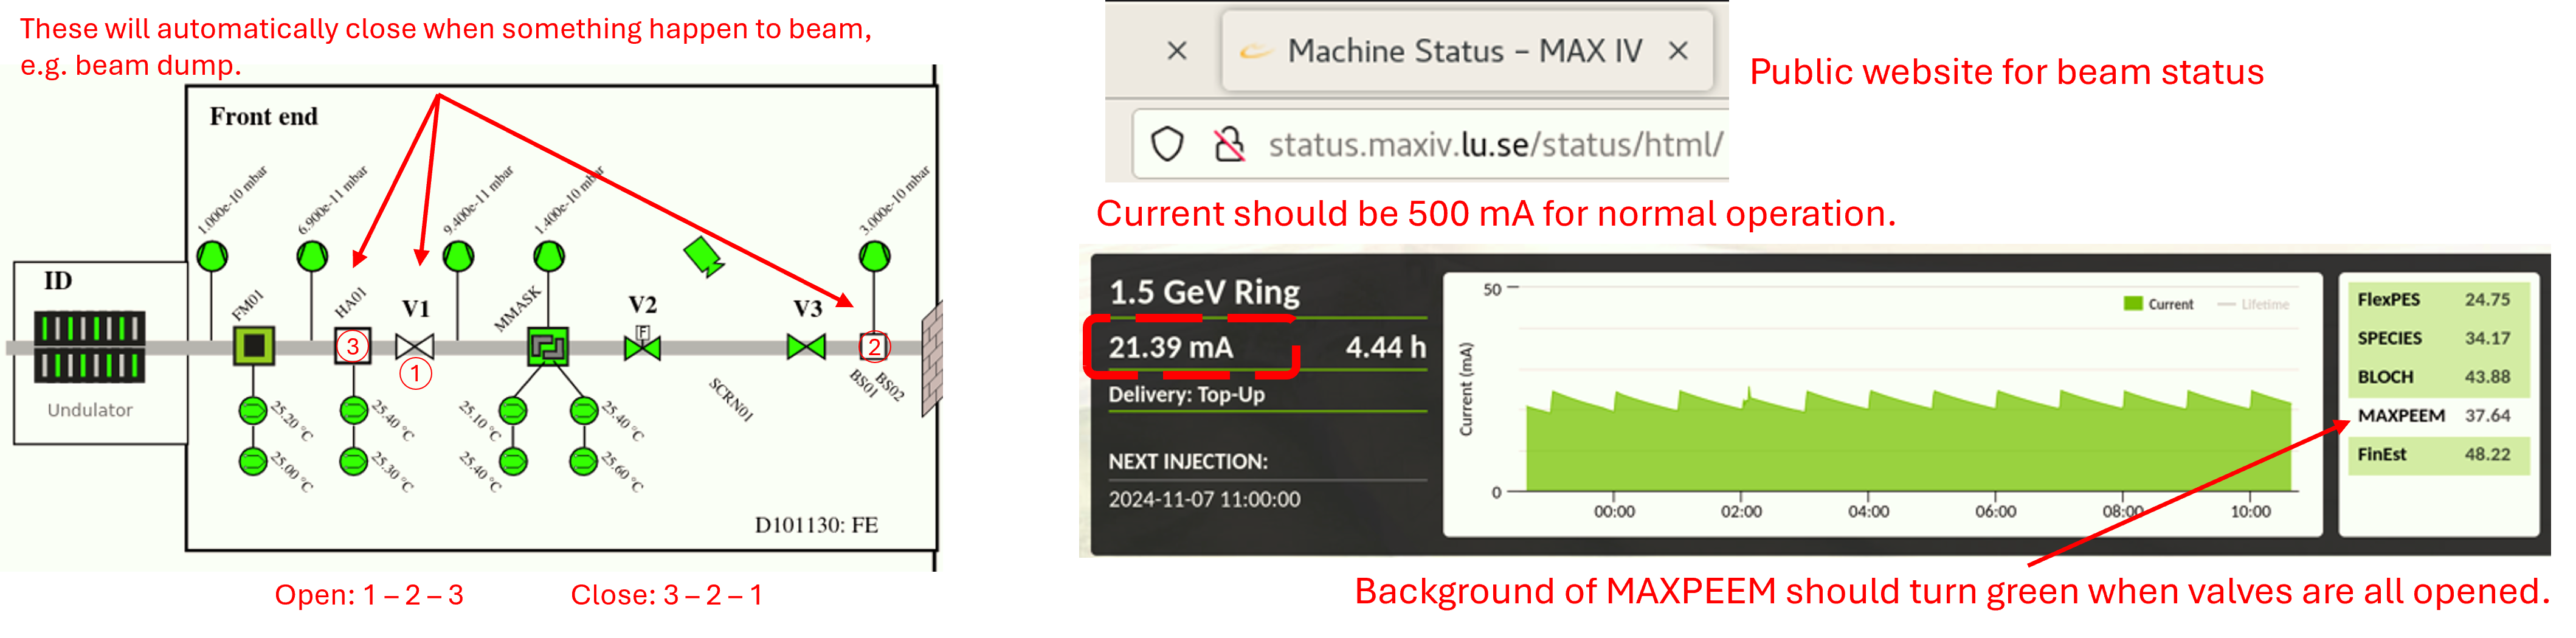
HA-01 and BS01 are used for blocking beam, and V1 is used for isolating the vacuum of storage ring.
The beam is opened or closed in this order to prevent direct illumination of beam on V1, which is metal and might melt under illumination.
Beamline software gets stuck
If the beamline staff are not around, try:
Restart in Astor
Kill the process using the sardana-restart script
Calling the Floor Coordinators
When HV switches off due to an arc
Ramp down the cathode current by turning the knob counterclockwise (Gun control unit - Filament current: 1.75 A to 0 A)
Put the power supply unit of the cathode (Gun control unit), the electron analyzer (Electron analyzer control unit), the aberration corrector (Mirror control unit) and the start voltage (Start voltage control unit) into the “local” control mode by rotating the knob to the right. (Status 1 for switch on HV rack: Every unit stands by at local mode.)
Switch on the HV rack by pressing the round green button at the bottom of the HV rack
Wait for 10 to 20 seconds
Put the power supply units back to the “remote” control. The LED displays of the individual power supplies should go to the values close to the values in the LEEM2000 program. (Status 2 for 20 kV: Every unit stands at remote mode, except Sample heater control unit! Power supply unit can be left at either local or remote mode.)
Ramp up the cathode current to 1.75 A slowly (in 10 to 20 seconds for instance) (Gun control unit - Filament current: 0 A slowly to 1.75 A).
Ramp up the main 20 kV until the pressure is recovered, i.e., when the pressure is below 1x10^-9 torr in the main chamber.
If there is any uncertainty that another arc may occur, perform Step 7 before Step 6. Carefully monitoring the pressure during adjustments.
The normal procedure of turning on high voltage rack can be found here.
Camera not operating
In case of misoperation, the steps will be provided in text rather than images. If any referenced items are unclear, please consult the beamline scientist before proceeding.
Log out of the system via Task Manager: Sign Out
Sign in as Other User. Follow the on-screen hint. (Enter as instructed, case does not matter, all lowercase is fine.)
If U-view was not closed before signing out, you may need to restart the camera. Wait a minute before turning on the camera from off.
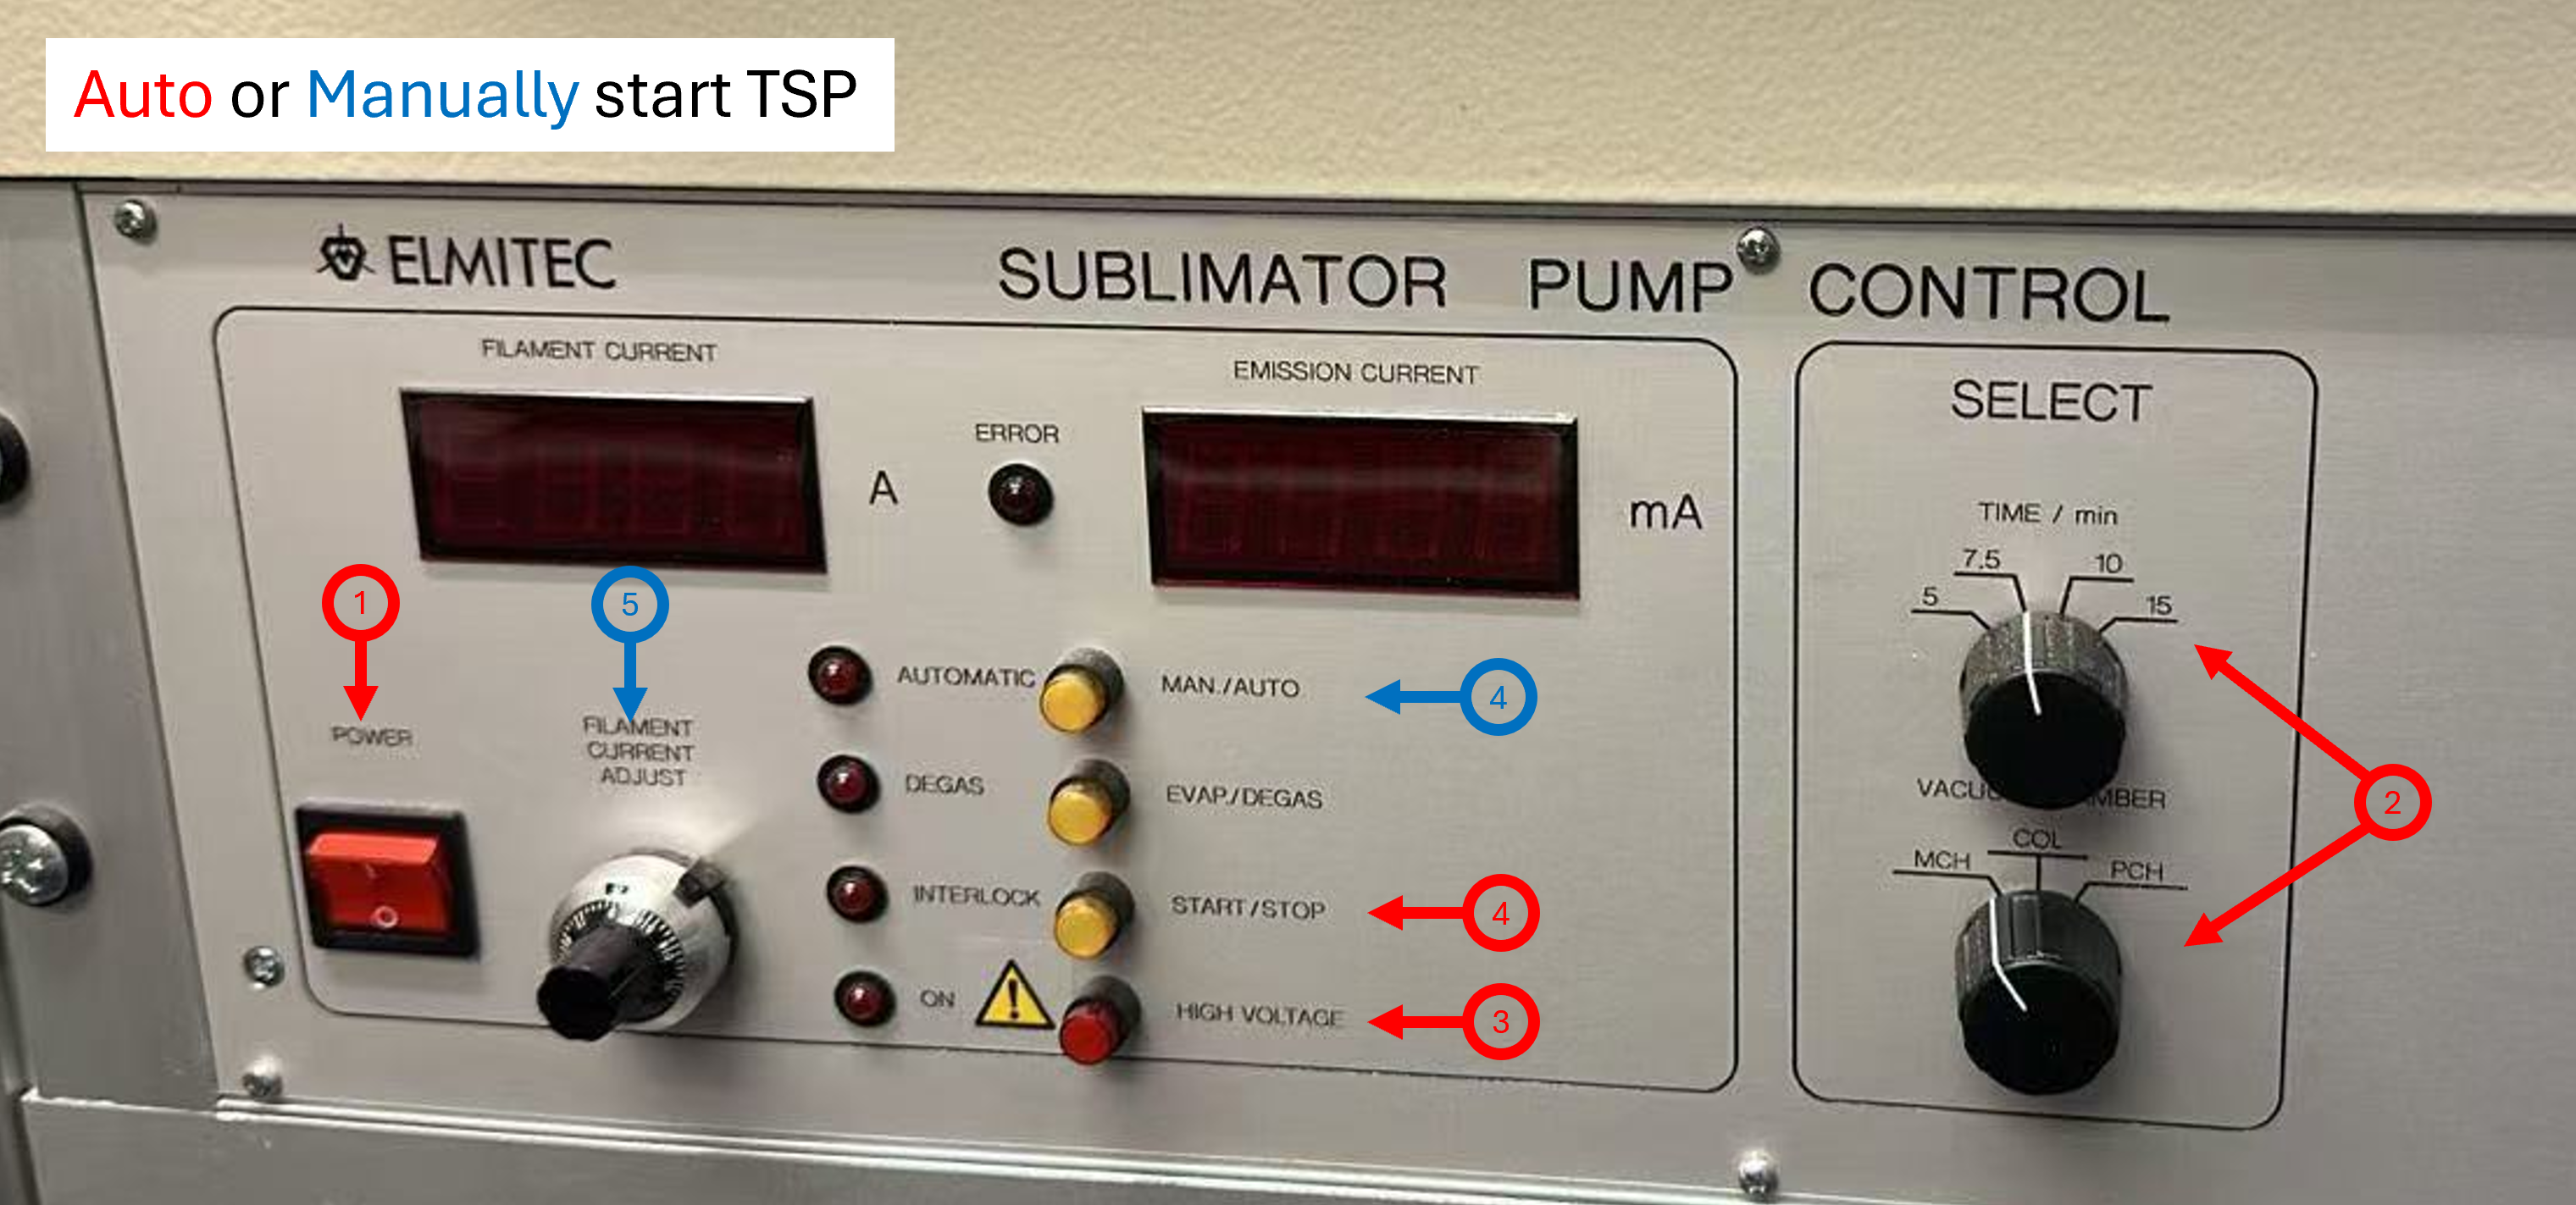
How to use TSP (Titanium Sublimation Pump)
Turn on the TSP using red square switch.
Select chamber you want the TSP to run on, and set the duration (typically 7.5 minutes).
Press High Voltage (red circlar buttion).
Quickly press Start. (no need to wait)
If the automatic mode does not work:
Press Man./Auto to enable the manual mode.
Use the knob to intrease the flament current until the emission reaches ~95 mA.
Run for the desired time (about 7.5 minutes)
When finished, reduce the filament current to zero.
Remember to Turn off TSP (red square switch).